These almond flour chocolate chip cookies are keto-friendly and gluten-free. One bowl, simple steps, and perfectly chewy cookies every time.
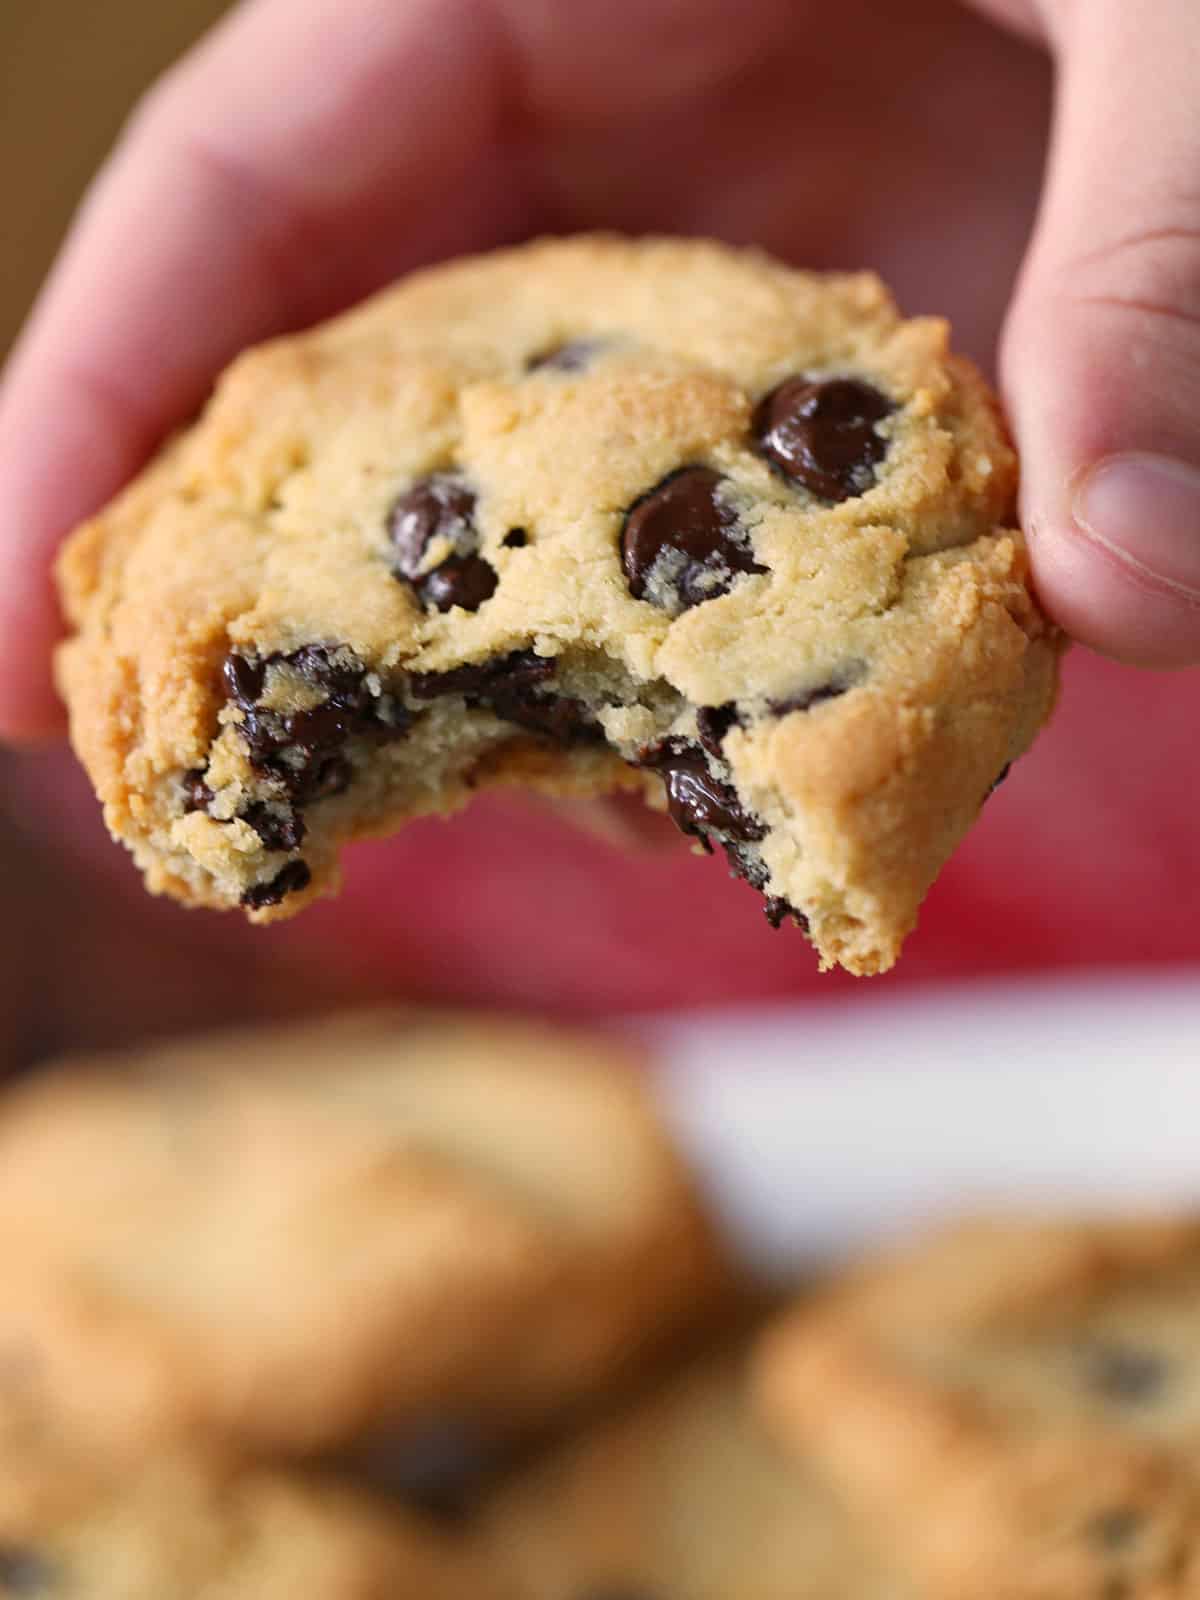
These amazing cookies are one of those happy instances where the gluten-free, low-sugar version is just as good as the original one. They are buttery, soft, and flavorful. The chocolate chips melt into the dough, giving you the best chocolate experience. Even my teenage testers, my toughest critics, love them. The leftovers keep well for several days, and you can also freeze them.
Ingredients
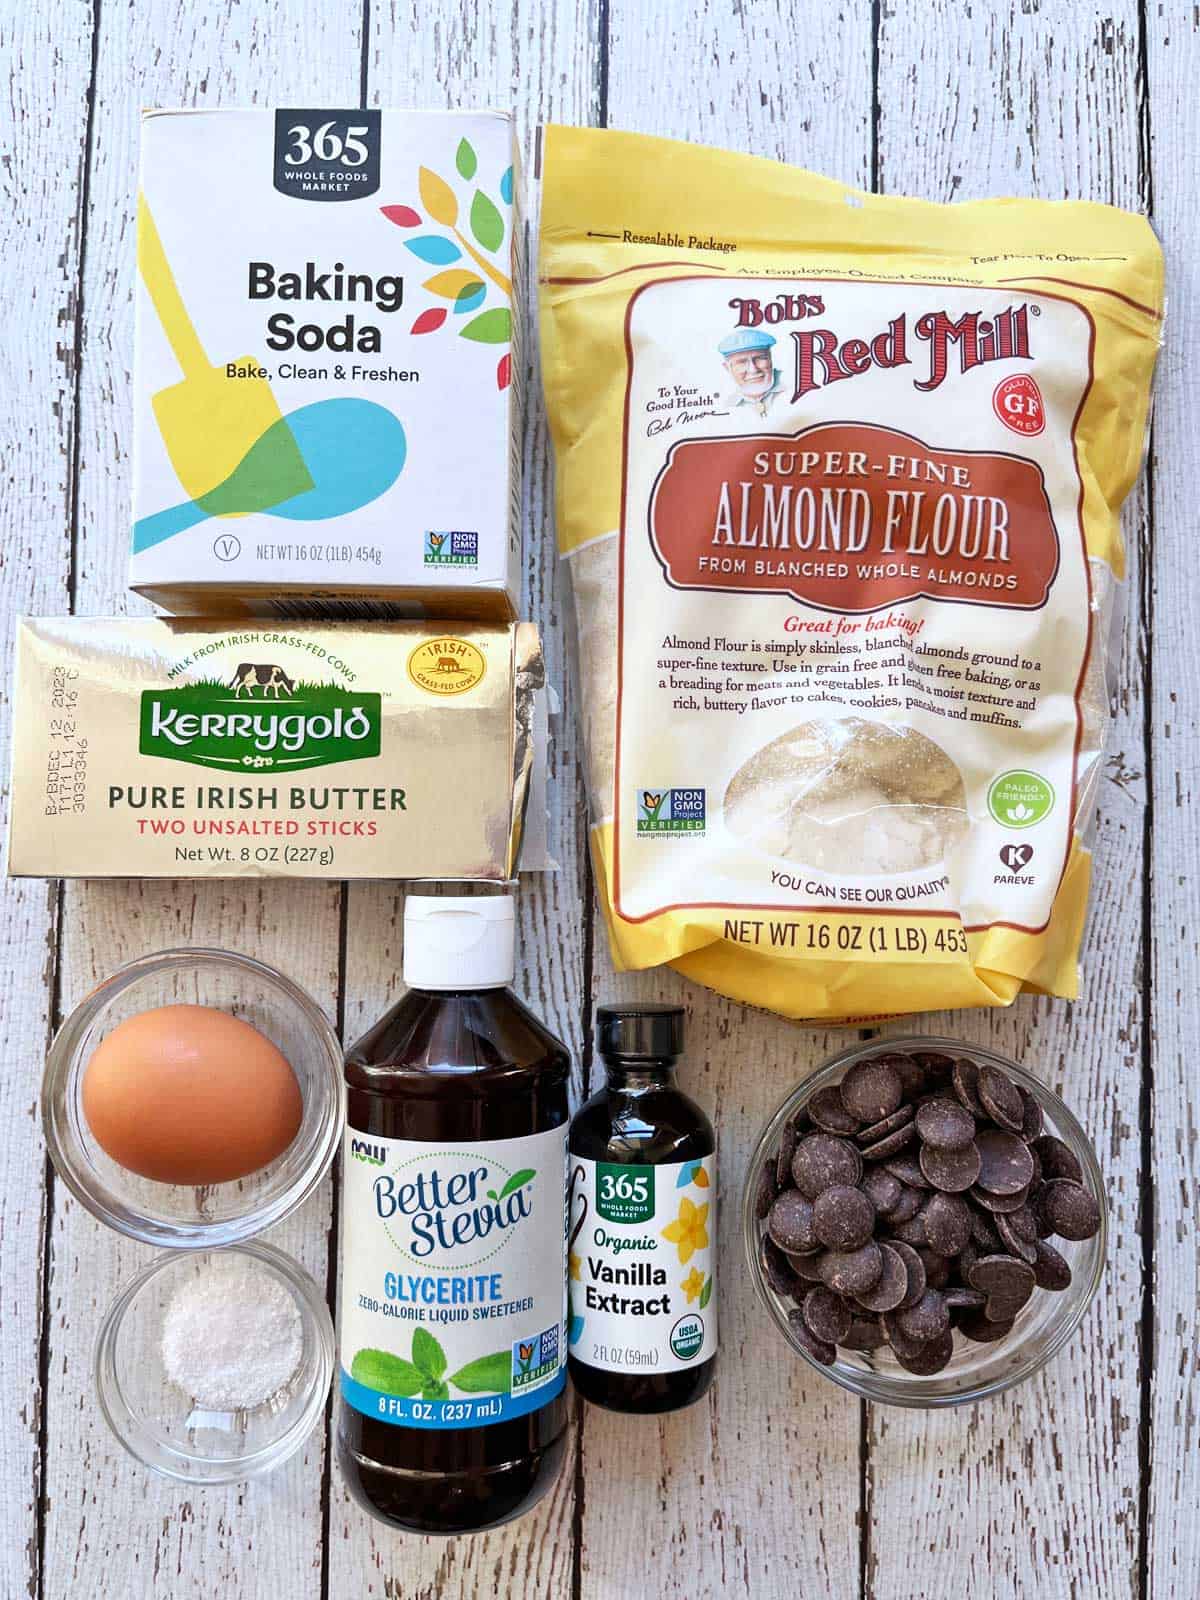
See the recipe card for exact measurements. Here are my comments on some of the ingredients.
- Sweetener: I use stevia glycerite. You can use a granulated sweetener instead, including sugar if you don't mind the additional carbs. If you use a granulated sweetener, check the dough's consistency. If it seems dry, add water or milk, a tablespoon at a time, until you reach a smooth dough consistency.
- Vanilla extract: While vanilla extract is a classic, I sometimes use almond, coconut, chocolate, or even orange extract. My favorite is almond extract.
- Almond flour: I use blanched, super-fine almond flour.
- Dark chocolate chips: I typically use 85% cacao chocolate chips.
Instructions
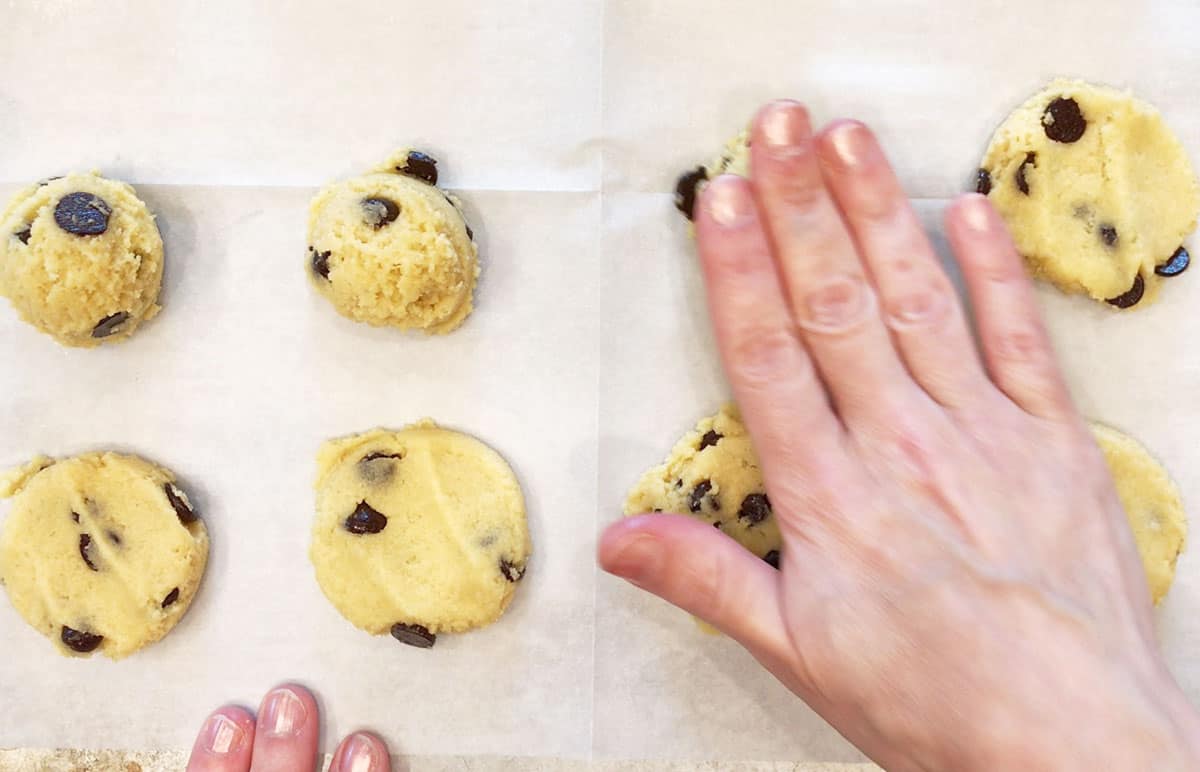
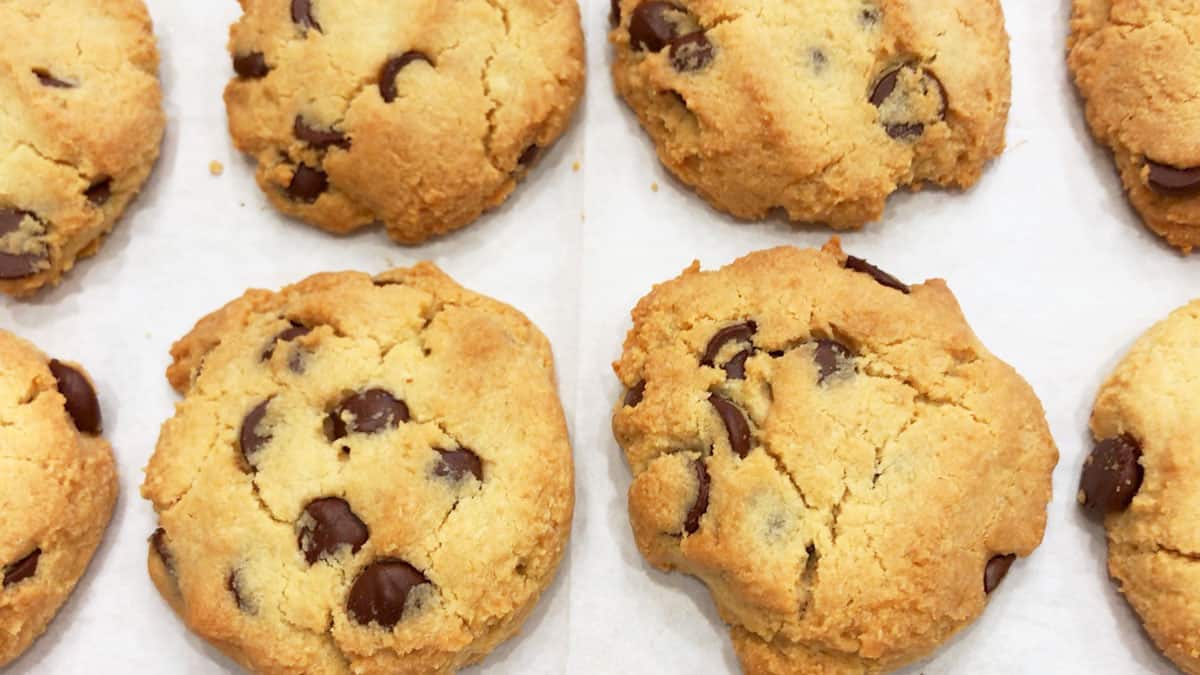
The detailed instructions and step-by-step photos are included in the recipe card. Here's a quick overview.
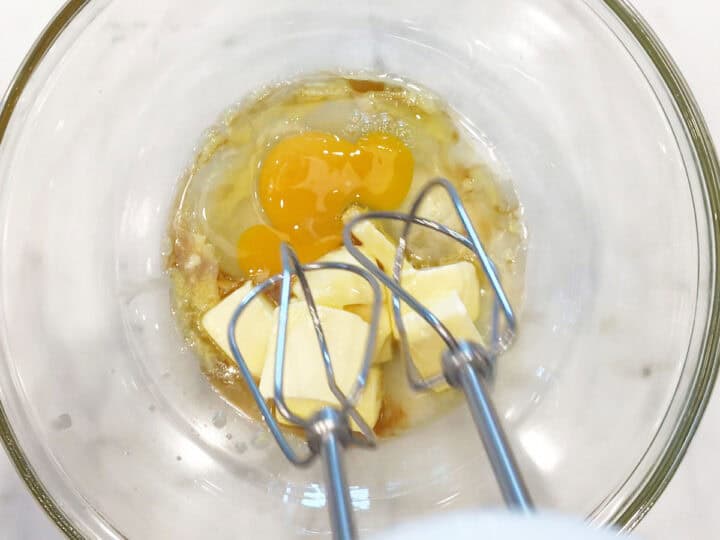
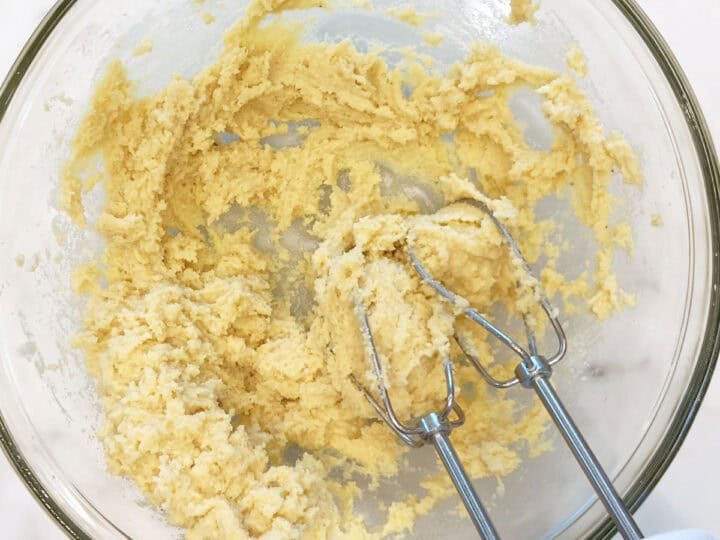
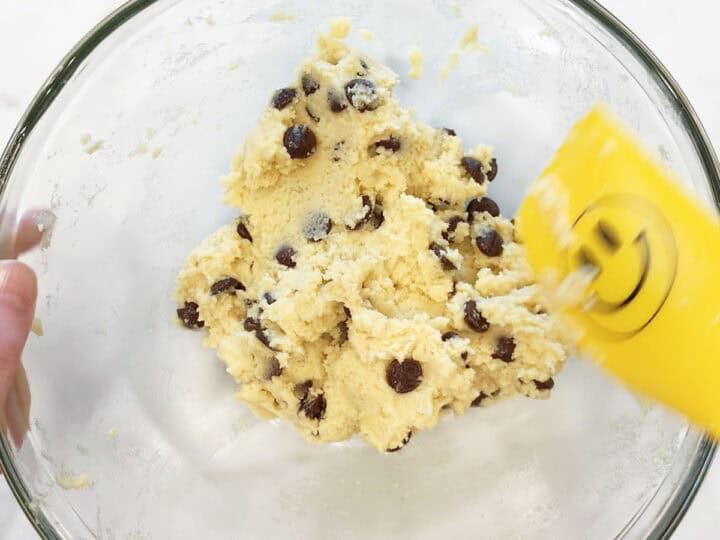
Using a handheld electric whisk, beat the butter, stevia, vanilla, and egg. Add almond flour, salt, and baking soda. Switch from the electric whisk to a rubber spatula and fold in the chocolate chips.

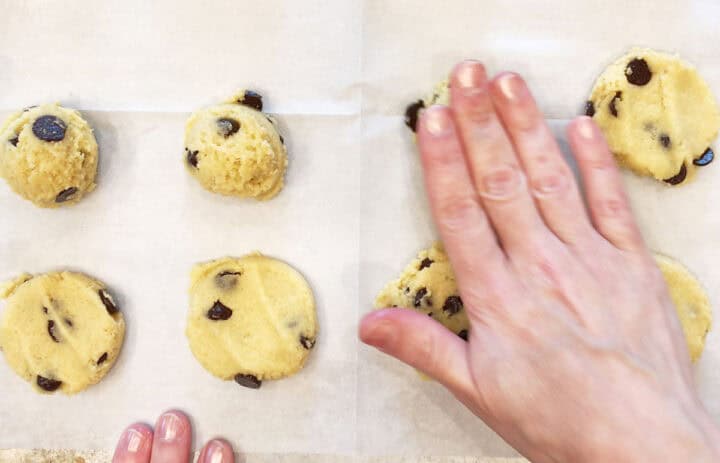
Use a small 2-tablespoon cookie scoop to transfer the batter onto a parchment-lined cookie sheet. Gently flatten the mounds with your hand.
Bake the cookies for about 14 minutes at 350°F. Let them cool on the baking sheet before enjoying them. This is the hard part. They smell so good!
They taste like a soft, chewy chocolate chip Nabisco® cookie! This recipe is my go-to cookie recipe. My husband and I are true fans of your dessert recipes. You never cease to amaze! Thank you, we appreciate you and your recipes so much!!
Joleene
Read more comments
Recipe Tips
- For the most accurate results, measure the almond flour by weight, not by volume.
- I prefer using a handheld mixer to a stand mixer because of the relatively low volume of ingredients.
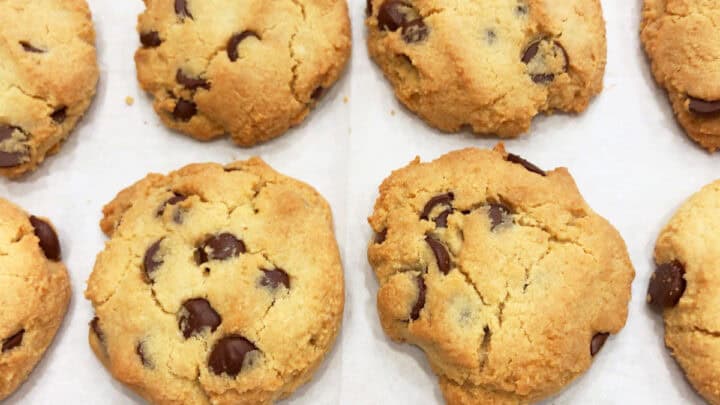
- When the cookies are done, they're not very browned. They are golden.
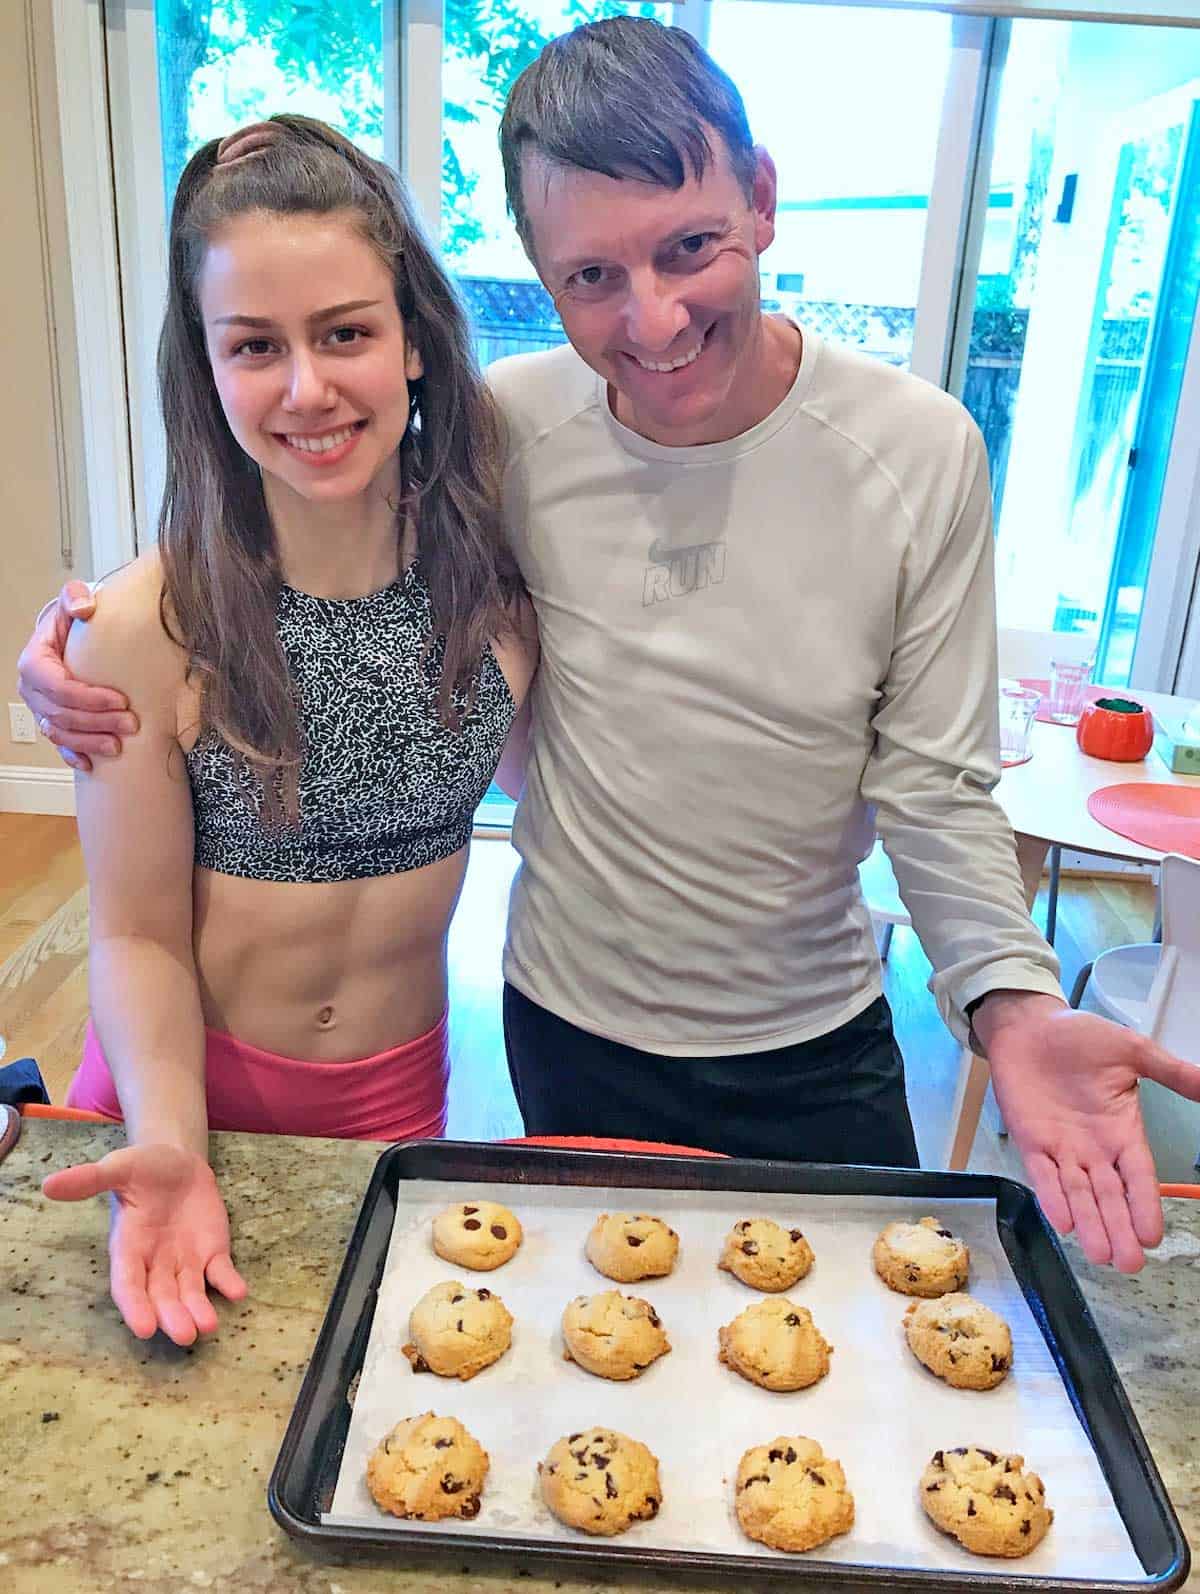
- The best way to ensure the cookies are chewy is to cool them completely on the baking sheet and not on a cooling rack, as my lovely daughter did when she baked these cookies for her dad for Father's Day! ❤️
Recipe FAQs
Yes! I sometimes melt the butter, let it cool slightly, then mix the batter with a hand whisk, switching to a silicone spatula when it turns into a thick dough.
No. It will add too much liquid to the dough. If you prefer to avoid stevia, use a granulated sweetener.
Yes. I experimented with adding ¼ cup of chopped pecans in addition to the chocolate chips, as shown in the image below. The cookies were delicious, and the pecans added flavor and crunch.
However, I felt the nuts became the most prominent flavor and masked the cookies' and chocolate chips' flavors. So, personally, I'm not a fan of adding nuts.
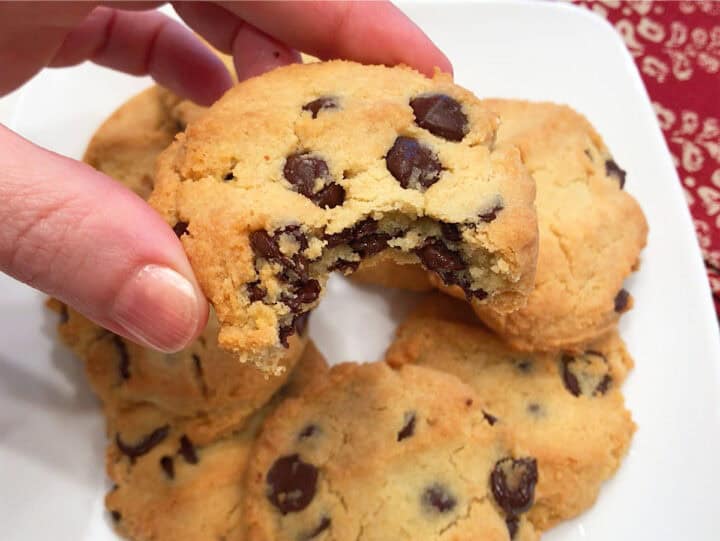
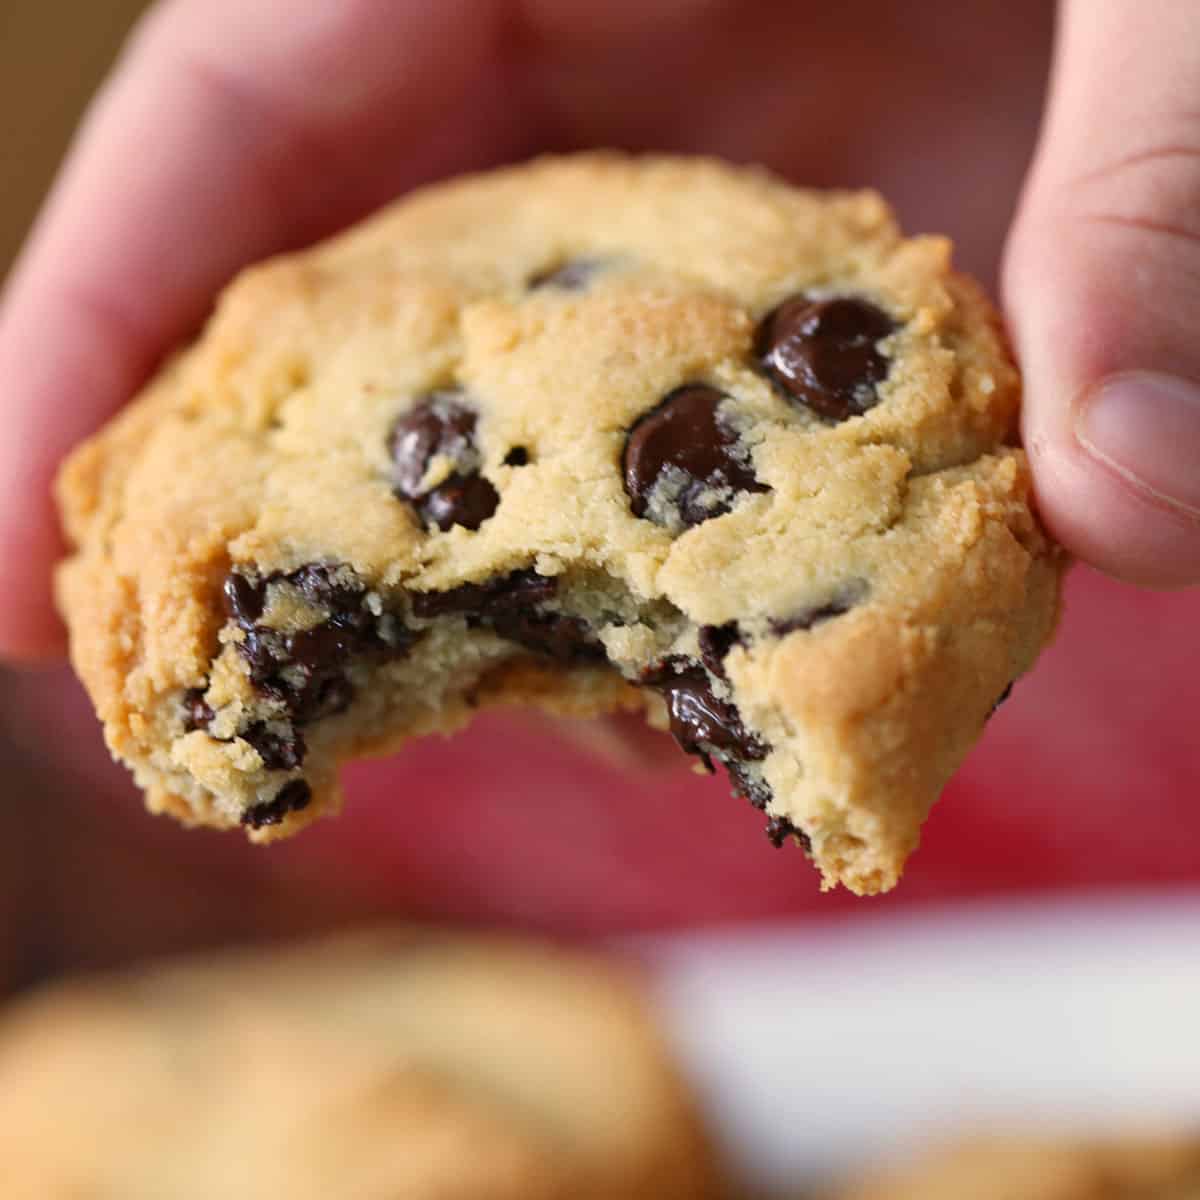
Their flavor and texture are slightly different, but in my opinion, they are just as good. They are soft and chewy (especially on the second day), chocolaty, and the slight almond flavor is a bonus, at least to my palate. The image below should give you a pretty good idea of their texture.
You can keep them in an airtight container (like the one shown in the photo below) at room temperature for up to four days. You can also freeze these cookies once they're completely cool. Place them in freezer bags and freeze them for up to three months.
Serving Suggestions
These cookies are wonderful on their own or with coffee, as shown in the image below. In the summer, I like to serve them with iced tea or iced coffee.

You can also crumble them on top of chocolate yogurt or homemade frozen yogurt, or layer them with homemade ice cream to make an ice cream sandwich.
Variation: Double Chocolate Chip Cookies

I made these for Valentine's Day this year (2026). They are amazing! They're softer and more cake-like than the original version, but they are just as good and deeply chocolaty.
To make them, add ¼ cup of unsweetened, Dutch-processed cocoa powder and reduce the almond flour by ¼ cup. Add 2 tablespoons of milk (since cocoa powder is drying). Sweeten the cookies with a granulated sweetener equal to ½ cup of sugar, or with 1 teaspoon of this concentrated monk fruit sweetener.
Place the cookie sheet in the fridge and chill the cookies for 20 minutes before baking - this will help them keep their shape. Bake them for 10 minutes, then cool completely on the baking sheet. They will be fragile until they cool.
Recipe Card

Almond Flour Chocolate Chip Cookies
Video
Ingredients
- 6 tablespoons unsalted butter - soft
- 1 teaspoon stevia glycerite - equals ⅓ cup of sugar
- 1 teaspoon vanilla extract
- 1 large egg
- 1 ½ cups superfine almond flour - 6 ounces - It's best to measure by weight
- pinch salt
- ¼ teaspoon baking soda
- ½ cup dark chocolate chips - 3 ounces
Instructions
- Preheat the oven to 350°F. Line a cookie sheet (or a baking sheet) with parchment paper.

- In a large mixing bowl, using a handheld electric whisk on medium speed, mix the butter, stevia, vanilla, and egg. The mixture won't be smooth at this point, and that's okay. Scrape the sides of the bowl with a rubber spatula as needed.6 tablespoons unsalted butter, 1 teaspoon stevia glycerite, 1 teaspoon vanilla extract, 1 large egg
- Gradually mix in the almond flour, ½ cup at a time, until well-blended. Then mix in the salt and baking soda. Scrape the sides of the bowl with a rubber spatula as needed.1 ½ cups superfine almond flour, pinch salt, ¼ teaspoon baking soda
- Using a rubber spatula, fold in the chocolate chips.½ cup dark chocolate chips
- Drop the dough by rounded tablespoonfuls (I use a 2-tablespoon scoop) onto the prepared cookie sheet, 2 inches apart. Gently flatten and shape the mounds with the palm of your hand.

- Bake the cookies until lightly browned. Depending on how hot your oven runs, this can take 12 to 20 minutes. In my oven, it usually takes 14 minutes.

- Let the cookies cool on the baking sheet for about 20 minutes before enjoying them.


Notes
- The cookies' texture improves dramatically after being stored in an airtight container at room temperature for 24 hours. They become soft and chewy, and their texture is much closer to the real thing than the freshly baked cookies, which tend to be more crumbly.
- It's best to measure almond flour by weight. If you don't have a kitchen scale, use the spoon-and-level method. Gently stir it in its container to loosen it. Using a spoon, lightly scoop the flour into your measuring cup without pressing it down. Once the cup is slightly overflowing, use the flat edge of a knife to level it off. Avoid dipping the measuring cup directly into the bag, as this can pack the flour and lead to using more than the recipe calls for.
- I use stevia glycerite. You can use a granulated sweetener instead, including sugar if you don't mind the additional carbs. If you use a granulated sweetener, check the dough's consistency. If it seems dry, add milk, a tablespoon at a time, until you reach a smooth dough consistency.
- Sweetness is a personal preference. Use this recipe as a guide and adjust to taste.
- You can keep the leftovers in an airtight container at room temperature for up to four days. You can also freeze these cookies once they're completely cool. Place them in freezer bags and freeze them for up to three months.
Nutrition per Serving
Save this Recipe!
We will also add you to our weekly newsletter. Unsubscribe anytime. See healthyrecipesblogs.com/privacy/ to learn how we use your email.
Disclaimers
Most recipes are low-carb and gluten-free, but some are not. Recommended products are not guaranteed to be gluten-free. Nutrition info is approximate - please verify it. The carb count excludes non-nutritive sweeteners. Please read these Terms of Use before using any of my recipes.

Lupita says
I made these twice and they are really good and simple to make. Thank you for the recipe
Vered DeLeeuw says
You're very welcome, Lupita! I'm so glad you liked the cookies. Thanks for taking the time to leave a review.
Lynn Finkenbinder says
I love chocolate chip cookies, and these are great!
Vered DeLeeuw says
Thank you so much, Lynn! My family loves them.
JOANN OSWALD says
Based on all the great reviews, I doubled this recipe. Since I used a powdered monk fruit sweetener, I decided to use 1/3 cup white and 1/3 cup brown sugar monk fruit and they came out great. Also used tiny dark chocolate ChocZero chips.
Would love to try these again using half peanut butter for the butter. Note: I live at a high altitude and use a convection oven and these only took 9 mins. @ 350.
Vered DeLeeuw says
I'm so glad you enjoyed these cookies, Joann! Thank you very much for the review and for sharing your tweaks.
Olivia says
No lie, these cookies are straight fire. Legit tastes just like regular cookies and absolutely smokes any packaged ones. Way better than store stuff. Can’t stop snacking on them!
Vered DeLeeuw says
I'm so glad you like them, Olivia! Thank you for making the recipe and for the lovely review. 🙂
Bev says
I followed the recipe exactly and found the cookies too dry. Is there something I can add next time to make them more moist?
Vered DeLeeuw says
Hi Bev,
Thank you for trying the recipe and for your feedback. These cookies are meant to be soft and tender. A dry texture usually means they were slightly over-baked or that too much flour was used.
If you try them again, I recommend weighing the flour. If that's not an option, lightly spoon the flour into the measuring cup and level it off, rather than scooping directly from the bag. Also, take them out of the oven as soon as the edges are set, even if the centers still look slightly underdone. They continue to firm up as they cool.
If you'd like to experiment, you could also try adding an extra tablespoon of butter. I hope that helps, and I'd love to hear how they turn out next time.
Jennifer says
Absolutely loved these cookies. I'll be making these whenever we have the need for something sweet. They don't spike my boyfriend's sugars. So happy to find this recipe.
Vered DeLeeuw says
I'm so happy to hear that, Jennifer! Thank you so much for taking the time to write a review and share your experience.
Kristin says
I really enjoyed these cookies!
Vered DeLeeuw says
I'm so happy you liked them, Kristin! Thanks for the review.