90 second bread is so versatile and the perfect everyday quick bread. It has a lovely spongy texture that readily soaks up butter, sugar-free honey, or jam.

Keto substitutions can mean the difference between sticking with your diet or giving up because you feel deprived. This 90 second bread is one of my favorite substitutions. It's made with coconut flour and "baked" in the microwave in just ninety seconds, hence its name. It's quick (much quicker than cloud bread), versatile, and enables you to enjoy bread on the keto diet.
Ingredients
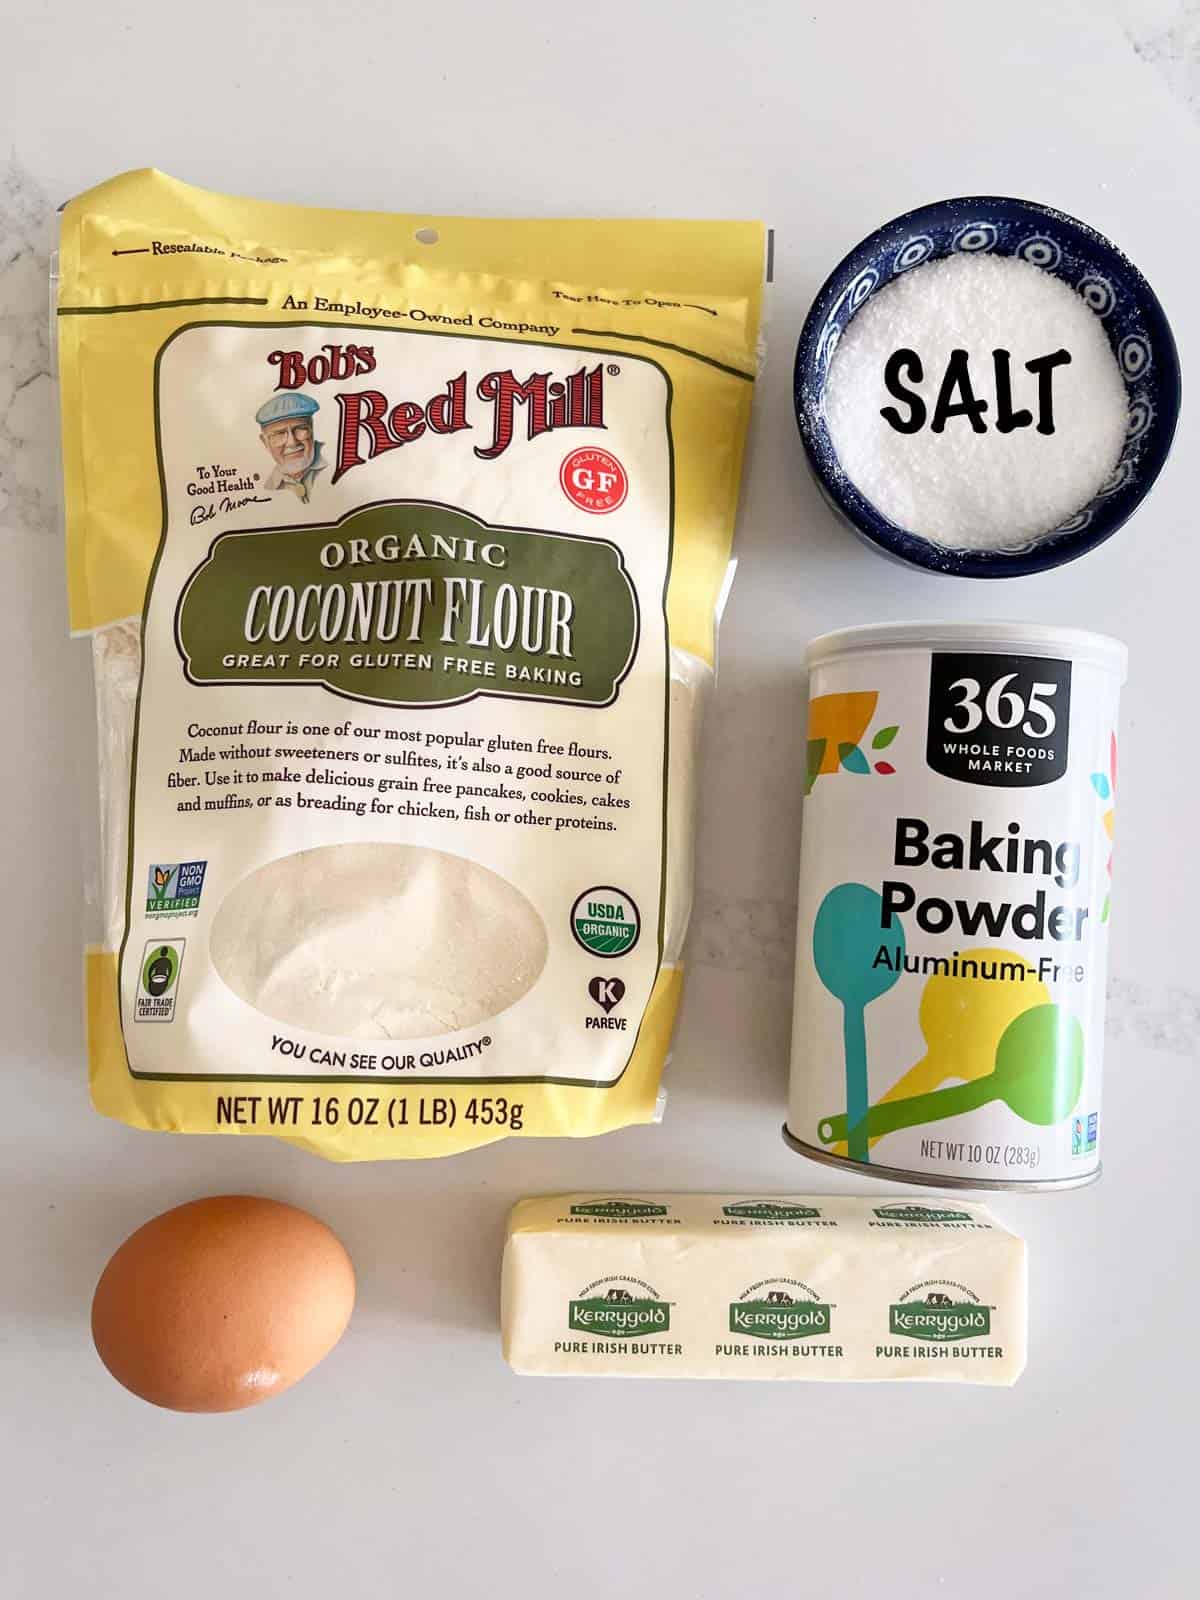
See the recipe card for exact measurements. Here are my comments on some of the ingredients.
- Unsalted butter: It's possible to use mayonnaise or oil instead of butter. But I like the taste of butter.
- Coconut flour: Although it has the potential to be drying, once you get the ratios right, it's an excellent flour to work with and produces fluffy baked goods.
- Baking powder: It helps the bread rise, so please make sure it's fresh and not expired. If you need it to be gluten-free, ensure it is.
Flavor Variations
- Add garlic powder (¼ teaspoon) and shredded cheese (a heaping tablespoon). Thanks to reader Karen for the idea! I tried it and loved it.
- For a sweet version, I like to omit the salt and add ¼ teaspoon each of stevia glycerite (or 1 tablespoon of a granulated sweetener), vanilla, and cinnamon.
Instructions
The detailed instructions and step-by-step photos are included in the recipe card. Here's a quick overview.
Melt the butter in a small, microwave-safe ramekin. That's the ramekin you'll also use for microwaving the bread. After the butter has slightly cooled, add the remaining ingredients and mix them until smooth. This will require some patience!

Microwave the batter for 90 seconds. Allow the bread to slightly cool, and then remove it from the ramekin and slice it into two slices.

At this point, you can skillet-toast the slices in butter or olive oil if you wish. Top the slices with your favorite toppings and serve!

Well, this surprised me. What a clever little recipe. Made 2 for breakfast this morning and tried it as is and toasted. Probably make a good burger. Might try that in a couple of days.
Alma
Read more comments
Recipe Tips
- The 90-second rule works in almost any microwave I've tried. I have moved a few times since I started making this recipe, allowing me to try it in several microwave ovens. Having said that, microwave ovens vary. So, keep an eye on the bread. Perhaps in your microwave, it will only take 75 or 80 seconds? You can always add a few more seconds if it's not done.
- Remember that this is not wheat bread. It’s soft and a little eggy. But if you’re trying to limit your carb intake, it adds a nice variety to breakfast and lunch. It does taste much better, and much more like real bread, if you toast it in a buttered skillet after it's ready.
- If you prefer to use almond flour, try this recipe for keto English muffin, another quick, low-carb bread you can make in the microwave.
- To make this bread in the oven, mix the batter in an oven-safe ramekin. Bake the bread in an oven preheated to 350°F for about 10 minutes. Check with a toothpick to ensure it's fully baked. Ovens vary, so keep an eye on the bread while it's in the oven. It might take a shorter or longer time to be fully baked.
- Toasting the bread in a buttered skillet greatly improves its flavor and texture. To do it, add a pat of butter to a nonstick skillet, and cook the bread over medium-low heat until golden brown, about 2 minutes per side. This is what it looks like when toasted:

Serving Suggestions
90 second bread has a neutral flavor and a spongy texture, perfect for butter, sugar-free honey, or jam, so it works well for a quick, low-carb breakfast.
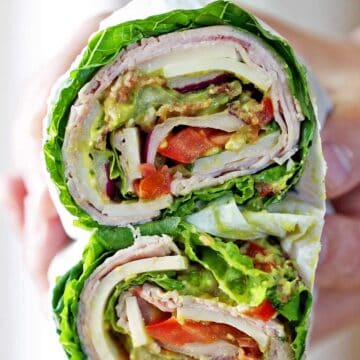
It’s also good topped with peanut butter, cream cheese and smoked salmon, or Dijon mustard and ham. I also enjoy it with pimento cheese, crab salad, and salmon salad.
It's wonderful with Shakshuka! But my favorite use for this bread is to make a cheesy and gooey keto grilled cheese sandwich. It's so good!
Storing Leftovers
To keep the leftovers, slice each piece of bread crosswise into two slices and allow the slices to cool completely. Then, place them in an airtight container in the fridge for up to four days.
When ready to use, I highly suggest skillet toasting the leftover slices in butter or olive oil. But you can also gently reheat them in the microwave, about 10 seconds per slice, at 50% power.
You can also freeze slices of the completely cooled bread. Microwave them frozen to defrost, or use your toaster on the lowest setting.
Recipe Card

90 Second Bread (Keto, Low-Carb)
Video
Ingredients
- 1 tablespoon unsalted butter - if using salted, omit the salt
- Pinch salt -
- 1 large egg
- 1 tablespoon coconut flour - a level (not heaping) measuring tablespoon, 7 grams
- ¼ teaspoon baking powder - gluten-free if needed
Instructions
- In a small, microwave-safe bowl or ramekin (mine measures 3 inches on the bottom and 3.5 inches at the top), melt the butter in the microwave.

- Allow the melted butter to slightly cool, and then mix in the salt, egg, coconut flour, and baking powder. Keep mixing patiently until smooth.
- Microwave the mixture on high for 90 seconds. The bread will puff up while "baking" and then slightly deflate. When done, it will look like a muffin. Ensure it appears set. Otherwise, microwave it for 10-20 more seconds (but 90 seconds should be enough, and overcooking can dry it). Take care when removing it from the microwave. The ramekin will be hot.
- Let the bread cool slightly for a minute or so. Then, gently, with a paring knife, loosen the edges and remove the bread from the ramekin onto a plate and slice it crosswise into two slices.
- Top the bread with your favorite toppings and serve.


Notes
- To make this bread in the oven, mix the batter in an oven-safe ramekin.
Bake the bread in an oven preheated to 350°F for about 10 minutes.
Check with a toothpick to ensure it's fully baked. Ovens vary, so keep an eye on the bread. It might take a shorter or longer time to be fully baked. - Toasting the bread in a buttered skillet greatly improves its flavor and texture, but is not mandatory. Usually, I don't bother. However, if you try this bread and find that you dislike it (some do), I highly suggest trying it toasted.
- To toast the bread, heat a pat of butter in a medium skillet over medium-low (not higher) heat, or spray the skillet with olive oil spray. Add the bread slices. Cook, gently pressing on them with a spatula to ensure even toasting, until golden, about 3 minutes per side.
- To keep the leftovers, slice each piece of bread crosswise into two slices and allow the slices to cool completely. Then, place them in an airtight container in the fridge for up to four days. When ready to use, I highly suggest skillet toasting the leftover slices in butter or in olive oil. But you can also gently reheat them in the microwave, about 10 seconds per slice, at 50% power.
- You can also freeze slices of the completely cooled bread. Microwave them frozen to defrost, or use your toaster on the lowest setting.
Nutrition per Serving
Save this Recipe!
We will also add you to our weekly newsletter. Unsubscribe anytime. See healthyrecipesblogs.com/privacy/ to learn how we use your email.
Disclaimers
Most recipes are low-carb and gluten-free, but some are not. Recommended and linked products are not guaranteed to be gluten-free. Nutrition info is approximate. Please verify it independently. The carb count excludes non-nutritive sweeteners. Please read these Terms of Use before using any of my recipes.


Alesha says
This was good. I needed a quick gluten free option for those odd days in the month when I feel for a tomato sandwich. This was perfect. I'm not on Keto so I swapped the coconut flour for my PC brand gluten free blend, and then i did toast it for the texture preference. Perfect. Thanks for sharing!
Jen says
Fantastic recipe! I put the bread mixture into my mini waffle maker with very good results. Thank you so much for such an easy and versatile recipe.
Vered DeLeeuw says
I'm so glad you enjoyed this recipe, Jen! Thanks for the tip about using a mini waffle maker.
Lillian Betancourt says
Thank you for the waffle tip! Genius!
Lashawndah says
Delicious and quick. We whipped this up just to try it and added a little honey to the finished product. Easy and terrific recipe!
Vered DeLeeuw says
I'm glad you liked it, LaShawndah!
Donna says
I made this 90 second bread and I am so glad! I bought coconut flour a while back, but I never found a recipe that looked exciting enough to make me want to try it until this one. The bread turned out great and was even better when I toasted it in a skillet and finished it with cheese. It was melty magic!
I looked forward to trying more of your recipes!
Vered DeLeeuw says
Yay! I'm so glad this was a success, Donna! Thanks for the review.
Efrat says
Best 90 seconds bread in my opinion.
Vered DeLeeuw says
Thank you so much, Efrat!
Janet says
I found your site while looking for tomato soup recipes, but then I got really curious about this 90 Second Keto Bread. Brava! I just tried it with grilled cheese, not realizing that the bread recipe in your grilled cheese recipe is slightly different. No matter, this was good in a pinch. Fortunately, I'm used to that egg-coconut flavor from a pancake recipe I have, so I was not expecting a real bread flavor. Aside from a couple of slip-ups, I haven't had any grain-based bread for almost 10 years. SO, thank you for this rather ingenious recipe and thank you for your site. I'm looking forward to that tomato soup!
Vered DeLeeuw says
I'm so glad you enjoyed this bread, Janet! I hope the tomato soup pleases as well.
Thank you for taking the time to write a comment. I appreciate it.
Silas says
I just found this and want to say thank you. I’ve searched for a lot of options that are easy and quick to put together. This has lead to a very happy girlfriend, who thought breads were not longer an option without spending a lot of time and/or money.
Vered DeLeeuw says
I'm so glad this was a success, Silas! Thanks for leaving a comment.
Layne says
Can you make this as a loaf in the oven? More than just a single serving size?
Vered DeLeeuw says
Hi Layne,
I only tested a single serving of this recipe.
Anne says
I have just discovered this 90-second bread when Googling for coconut flour recipes and as I was feeling peckish, I gave it a go. It was very easy to make and it was really nice; I had the 2 halves topped with butter and seedless raspberry jam.
This is one recipe I will definitely be making again.
Vered DeLeeuw says
So glad you liked it, Anne!
Ruthanna says
I was wondering how to make this bread in the oven?
Vered DeLeeuw says
To make it in the oven:
Mix the batter in an oven-safe ramekin.
Bake the bread in an oven preheated to 350°F for about 10 minutes.
Check with a toothpick to ensure it's fully baked.
Ovens vary, so keep an eye on the bread while it's in the oven. It might take a shorter or longer time to be fully baked.
Tricia says
I've just tried this bread for the first time. Very easy to make, apart from trying to measure 1 tablespoon of butter. I wonder how many grams that weighs?
Please give wattage of the microwave ovens you have used in your recipes. You must have made this in low-powered microwave ovens. Mine is 1000w. I reduced the power to 800w and cooked the bread for only 80 seconds. I need to reduce the power and/or time even more as the roll was slightly overcooked but still eatable.
Next time I shall add some herbs, maybe rosemary or thyme, to give the bread a little more flavour.
Vered DeLeeuw says
I'm glad you liked this recipe, Tricia. Thank you for your detailed feedback. I appreciate it.
My microwave oven's wattage is 1000 watts, which is standard.
A tablespoon of butter weighs 14 grams.
Adding herbs sounds like a wonderful idea!